In today’s fast-paced business environment, seamless communication and efficient workflows are essential for success. As organizations rely on tools like Salesforce for managing customer relationships and Google Chat for team collaboration, Google Chat and Salesforce Integration can unlock a world of possibilities. This blog provides a step-by-step guide for integrating Google Chat with Salesforce.
Step 1: Create a Google Cloud Console Project for Google Chat and Salesforce Integration
To begin the integration process, the first step is to create a project in Google Cloud Console. This project will serve as the foundation for enabling the Google Chat APIs and managing authentication for your integration. Follow these steps :
- Log in to Google Cloud Console
- Go to Google Cloud Console and log in with your Google account.
- Create a New Project
- Click on the Project Selector drop-down at the top of the page.
- Select New Project.
- Provide a name for your project (e.g., “GoogleChatSpace Integration”) and choose your organization or location.
- Click Create
- Once the project is created, you will have a pop up on the right side to select that project you want to integrate with Google Chat Space API.
- Enable Google Chat API
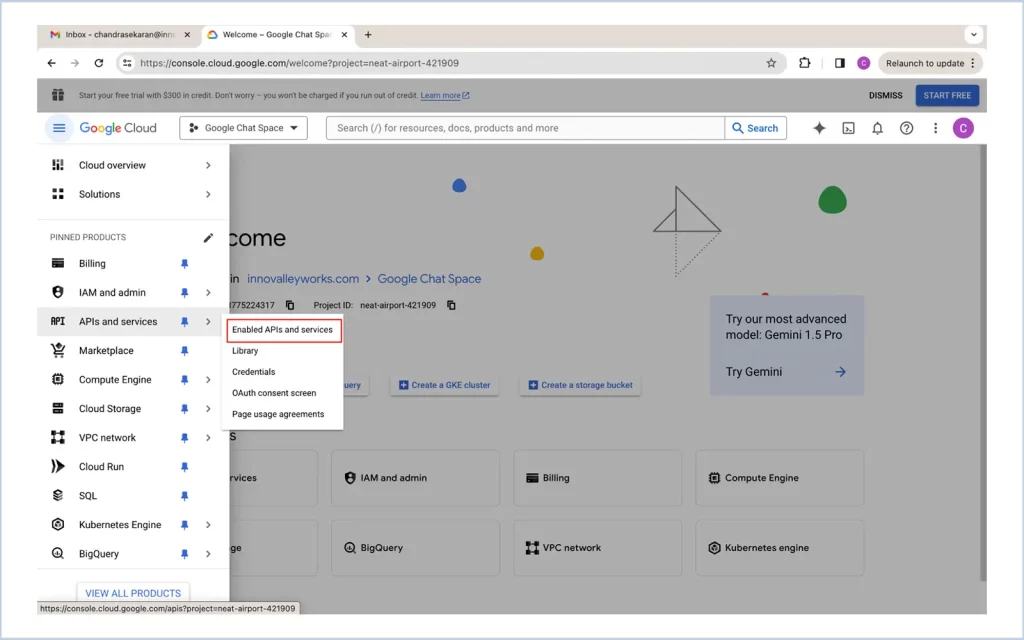
- Navigate to the APIs & Services > Enable API and Services section in the left-hand menu.
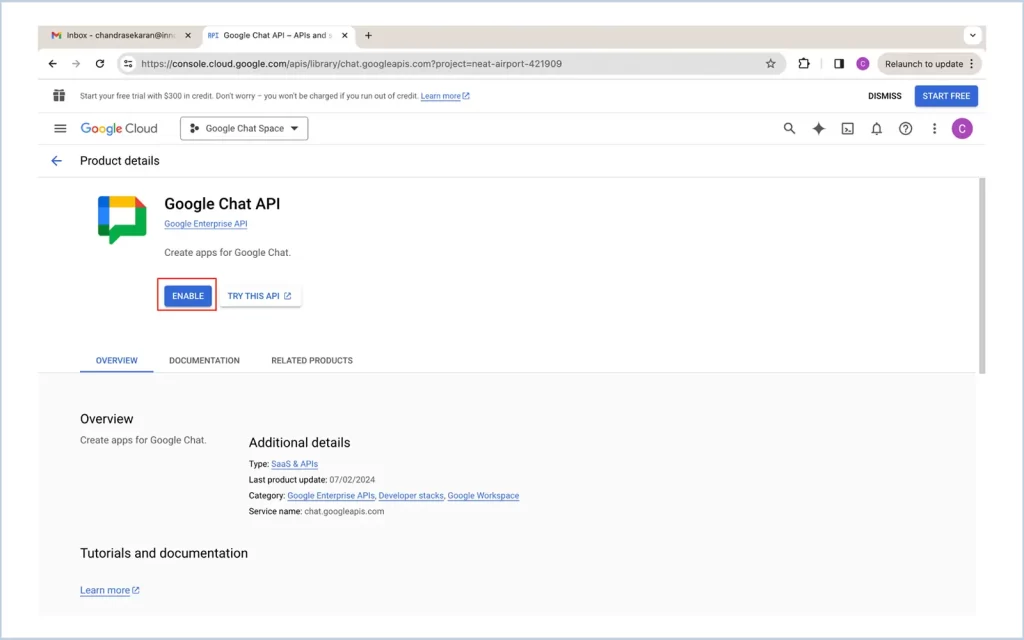
- Search for Google Chat API and click on it.
- Click the Enable button to activate the API for your project.
Step 2 : Get Credentials
After setting up your Google Cloud Console project, you need to configure the OAuth consent screen and generate credentials for the integration. Follow these steps to complete the process :
- Configure the OAuth Consent Screen
- In Google Cloud Console, navigate to APIs & Services > OAuth Consent Screen.
- Select the External radio button if you are testing with users outside your organization. If the testing is internal to your organization, select Internal.
- Click on CREATE.
- Register Your Application
- You will be redirected to the app registration page.
- Fill in all the mandatory fields, such as the App Name, User Support Email, and Developer Contact Information.
- Click Save and Continue.
- Configure Scopes
- On the next screen, click Add or Remove Scopes.
- Check all the scopes related to the Google Chat API to enable your app to interact with Google Chat.
- Click Save and Continue once done.
- Review and Save
- Review the details in the Summary section to ensure everything is correctly configured.
- Click Back to Dashboard to complete the OAuth consent screen configuration.
- Generate Credentials
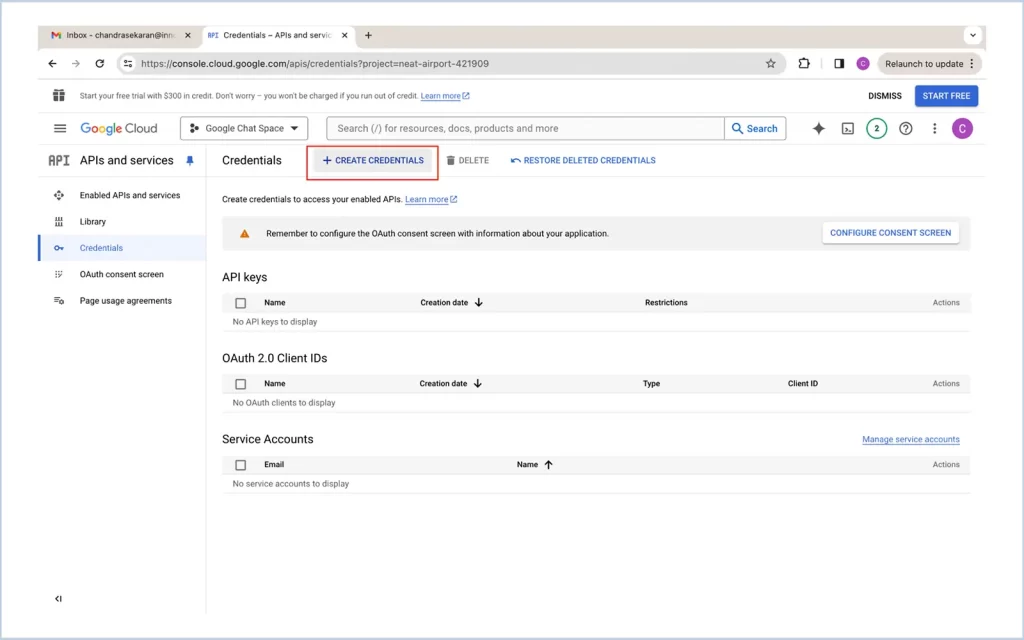
- Now go to APIs & Services > Credentials.
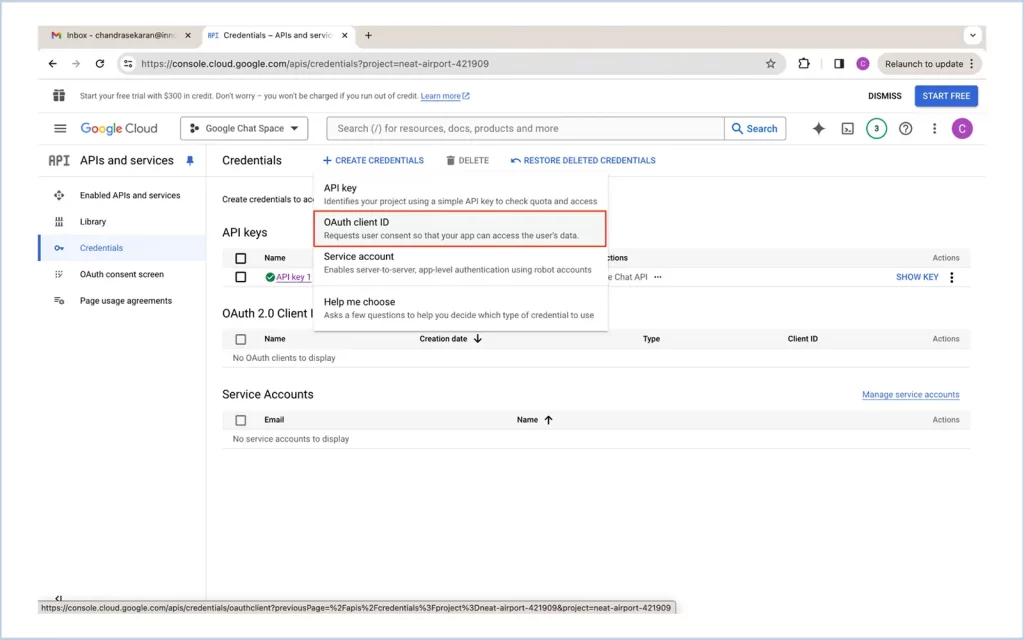
- Click Create Credentials and choose OAuth Client ID to generate client id and secret.
Once these steps are completed, your app will be configured with the necessary permissions and credentials to proceed with the integration. The next step is to set up a Google Chat bot and link it to Salesforce.
Step 3 : Configure the Enabled APIs and Services
With your OAuth consent screen configured and credentials created, the next step is to fine-tune the settings for the enabled APIs and services. Follow these steps :
- Access the Configuration Tab
- In Google Cloud Console, navigate to APIs & Services > Enabled APIs & Services.
- Locate the Google Chat API from the list and click on it.
- Fill in the Configuration Details
- Go to the Configuration tab within the Google Chat API settings.
- Fill in all the mandatory fields and enable interaction settings such as one to one conversation and Join spaces and group conversations
- Click Save to finalize the API configuration
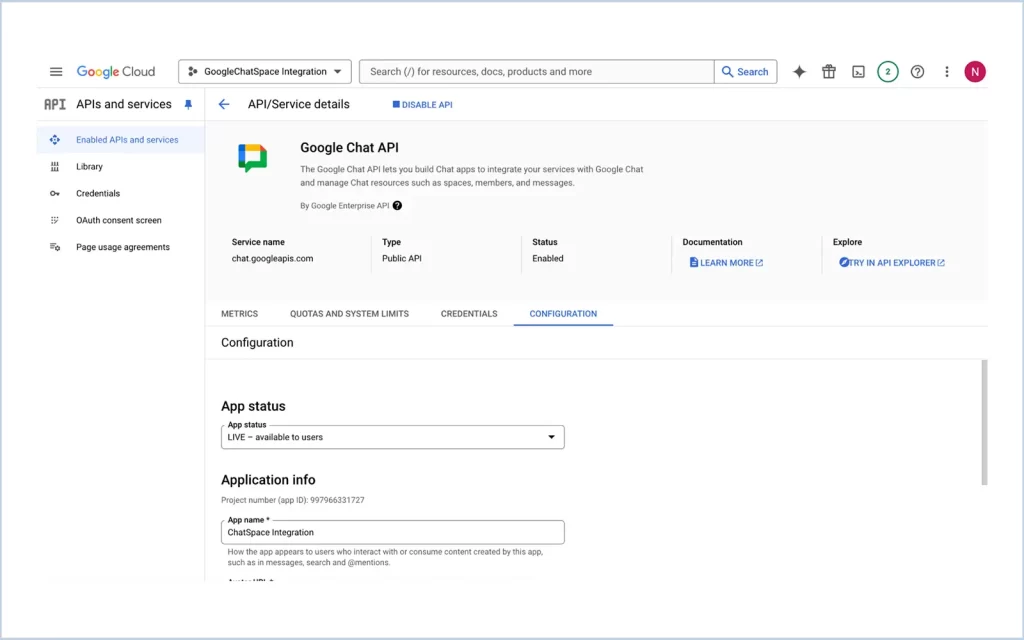
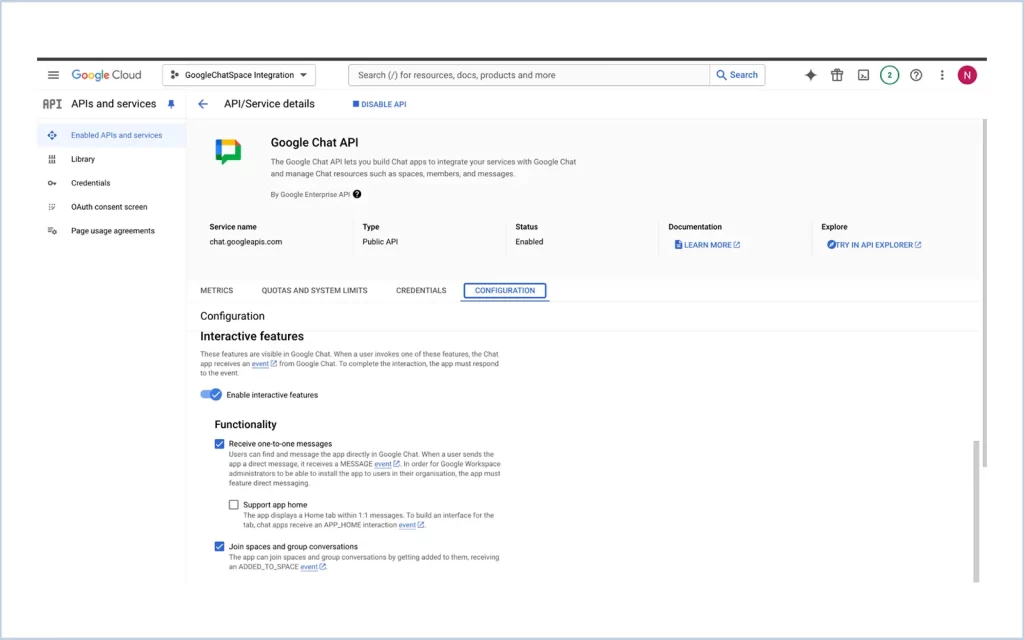
Now the setup in google cloud console is completed.
Step 4: Setting Up in Salesforce
After completing the Google Cloud Console configuration, the next step is to set up Salesforce to enable secure communication with Google Chat. This involves configuring an Auth Provider and creating Named Credentials.
Step 4.1: Set Up an Auth Provider
- Go to Setup in Salesforce and search for Auth Providers in the Quick Find box.
- Click New.
- Select Google as the provider type.
- Enter a name for the auth provider (e.g., “GoogleChatAuth”).
- Consumer Key: Copy the from the JSON file downloaded from Google Cloud Console.
- Consumer Secret: Copy the client_secret from Google Cloud Console.
- Token Endpoint URL: Use https://accounts.google.com/o/oauth2/token.
- Once all the details are entered,click save
- Callback URL: Copy the Callback URL provided by Salesforce and add it to the Redirect URIs in your Google Cloud Console project (under OAuth Consent Screen > Edit).
Step 4.2: Create Named Credentials
Navigate to Named Credentials
- In Setup, search for Named Credentials in the Quick Find box.
- Click on New Legacy to create a new credential.
2. Fill in the Details
- Label: Enter a name for the credential
- URL: Enter the base URL for the Google Chat API : https://chat.googleapis.com.
- Identity Type: Select Named Principal.
- Authentication Protocol: Choose OAuth 2.0.
- Authentication Provider: Select the authentication provider you created earlier (e.g., GoogleChatAuth).
3.Save the Named Credential
- Click Save to finalize the configuration.
Step 5: Using Apex Code to Integrate with Google Chat
With all the configurations in place, the next step is to write Apex code to interact with Google Chat. Below are three key functionalities :
5.1 Create a Chat Space
The following code demonstrates how to create a new Google Chat space programmatically :
/* Method to create a chat space */
public static void createSpace() {
   try {
       // Preparing the request payload
       Map<String, Object> jsonMap = new Map<String, Object>();
       jsonMap.put('spaceType', 'SPACE'); // Defining the type of space
      jsonMap.put('displayName', 'API - made Chat by Apex'); // Setting the space name
       jsonMap.put('externalUserAllowed', true); // Allowing external users (optional)
       String jsonBody = JSON.serialize(jsonMap);

       // Setting up the HTTP request
       HttpRequest request = new HttpRequest();
       request.setMethod('POST');
       request.setEndpoint('<Named_Credential_Alias>' + '/v1/spaces'); // Replace <Named_Credential_Alias> with your named credential alias
       request.setHeader('Content-Type', 'application/json');
       request.setBody(jsonBody);

       // Sending the request
       Http http = new Http();
       HTTPResponse response = http.send(request);

       // Processing the response
       if (response.getStatusCode() == 200) {
           Map<String, Object> responseMap = (Map<String, Object>) JSON.deserializeUntyped(response.getBody());
           String spaceId = (String) responseMap.get('name');
           System.debug('Space created successfully with ID: ' + spaceId);

           // Proceed to add members if the space is created
           addMembers(spaceId);
       } else {
           System.debug('Failed to create space. Status code: ' + response.getStatusCode());
           System.debug('Error response: ' + response.getBody());
       }
   } catch (Exception e) {
       System.debug('Exception occurred while creating space: ' + e.getMessage());
   }
}
5.2 Add Members to the Chat Space
Once a chat space is created, use the following code to add members to the chat space
Note : Use spaceId from create chat space API response
/* Method to add members to space */
public static void addMembers(String spaceId) {
   try {
       Map<String, Object> jsonMap = new Map<String, Object>();
       Map<String, Object> memberMap = new Map<String, Object>();

       memberMap.put('name', 'users/sampleuser@gmail.com'); // Replace with a valid user email
       memberMap.put('type', 'HUMAN');
       jsonMap.put('member', memberMap);
       String jsonBody = JSON.serialize(jsonMap);
       HttpRequest request = new HttpRequest();
       request.setMethod('POST');
     request.setEndpoint('<Named_Credential_Alias>' + '/v1/spaces/' + spaceId + '/members');
       request.setHeader('Content-Type', 'application/json');
       request.setBody(jsonBody);
       Http http = new Http();
       HTTPResponse response = http.send(request);
       if (response.getStatusCode() == 200) {
           System.debug(response.getBody());
       } else {
           System.debug('Failed to add members to space ---> StatusCode: ' + response.getStatusCode());
           System.debug('Add members error response--->' + response.getBody());
       }
   } catch (Exception e) {
       System.debug('Exception occurred: ' + e.getMessage());
   }
}
5.3 Create a Message in the Chat Space
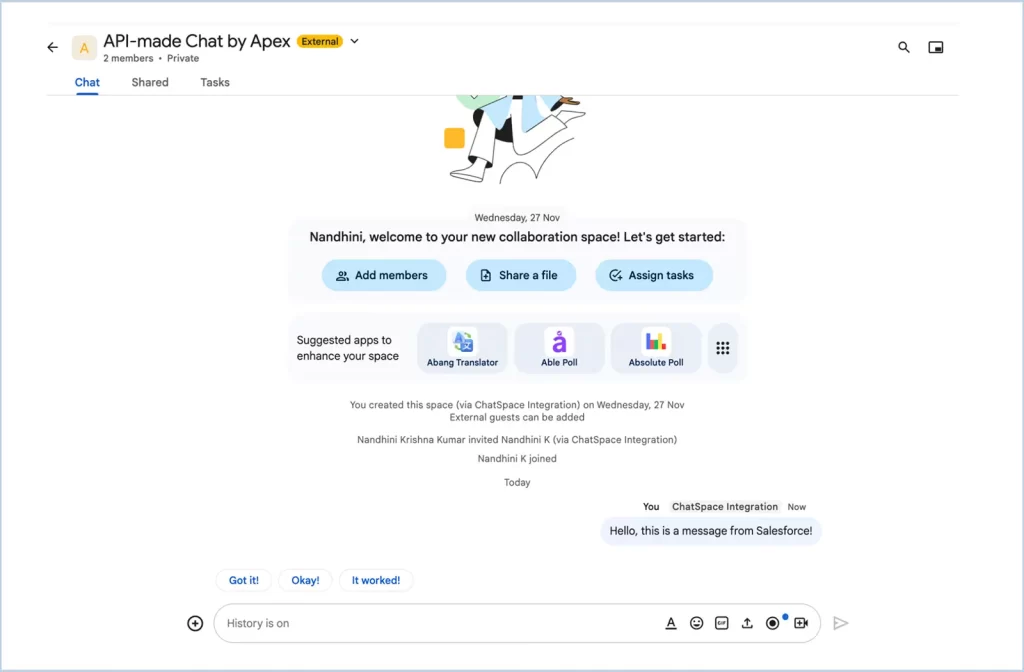
Finally, here’s how to create a message in the chat space:
Note : Use spaceId from create chat space API response
public static void createMessage(String spaceId) {
   try {
       Map<String, Object> jsonMap = new Map<String, Object>();
       jsonMap.put('text', 'Hello, this is a message from Salesforce!');
       String jsonBody = JSON.serialize(jsonMap);
       HttpRequest request = new HttpRequest();
       request.setMethod('POST');
       request.setEndpoint('<Named_Credential_Alias>' + '/v1/spaces/' + spaceId + '/messages');
       request.setHeader('Content-Type', 'application/json');
       request.setBody(jsonBody);
       Http http = new Http();
       HTTPResponse response = http.send(request);
       if (response.getStatusCode() == 200) {
           System.debug('Message sent successfully: ' + response.getBody());
       } else {
           System.debug('Message creation error response--->' + response.getBody());
       }
   } catch (Exception e) {
       System.debug('Exception occurred: ' + e.getMessage());
   }
}
We are Inno Valley Works, We are a passionate team of developers, best thinkers and consultants who can solve anything and everything.
With our highly engaging team, you can easily bring the vision to all your business ventures come true.
We have team, put your problem, get your solution
🎥 Check Out Our YouTube Channel
Explore helpful tutorials, product updates, and feature walkthroughs from the team at Innovalley Works.
👉 Visit Our Channel


 .
.