

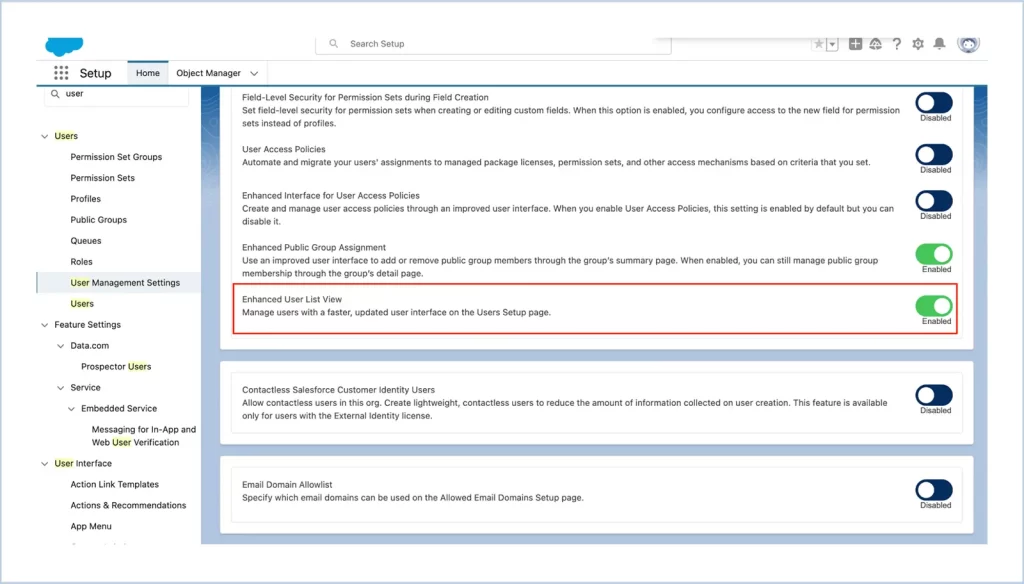
1. Make Inline Edits with the Enhanced User List View
The Make Inline Edits with the Enhanced User List View feature in Salesforce allows administrators to edit multiple user records directly within a list view. This feature makes it more convenient to manage user details such as roles, profiles, and status by enabling quick inline edits, without the need to open each user record individually.
How to Enable and Use Enhanced User List View for Inline Edits :
- Navigate to Setup.
- Access User Management Settings: In the Quick Find box, type User Management Settings and select it.
- Enable Enhanced User List View: Within User Management Settings, locate and enable the Enhanced User List View option.
- Edit User Information Inline: Once enabled, go to a user list view, where you can make inline edits. Simply click on the fields you wish to edit and make the necessary changes directly in the list view.
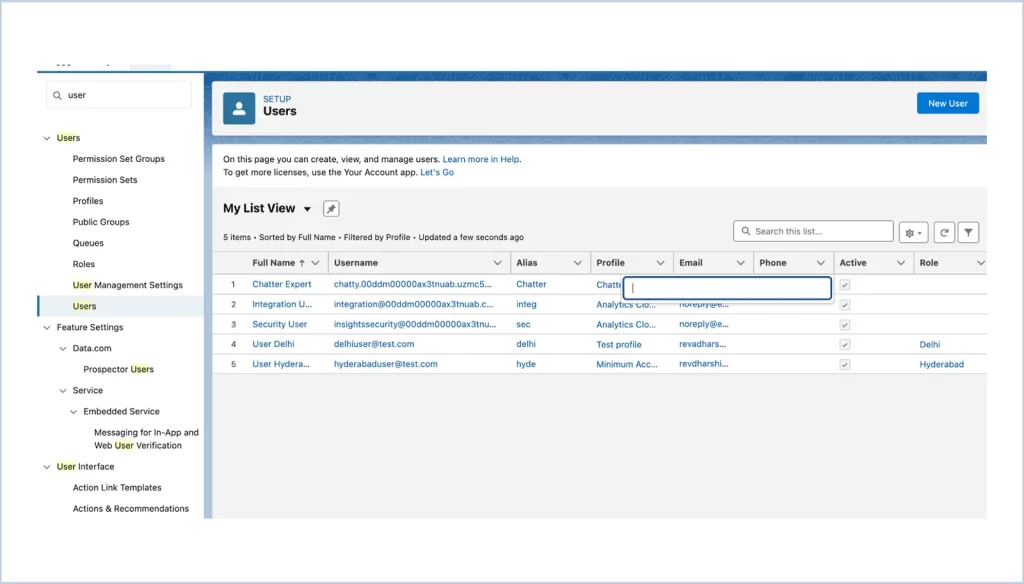
Use Case Example
Consider a situation where a Salesforce admin needs to update the phone number, email, company name, etc.. of several users. By enabling the Enhanced User List View, the admin can quickly update these fields in bulk.
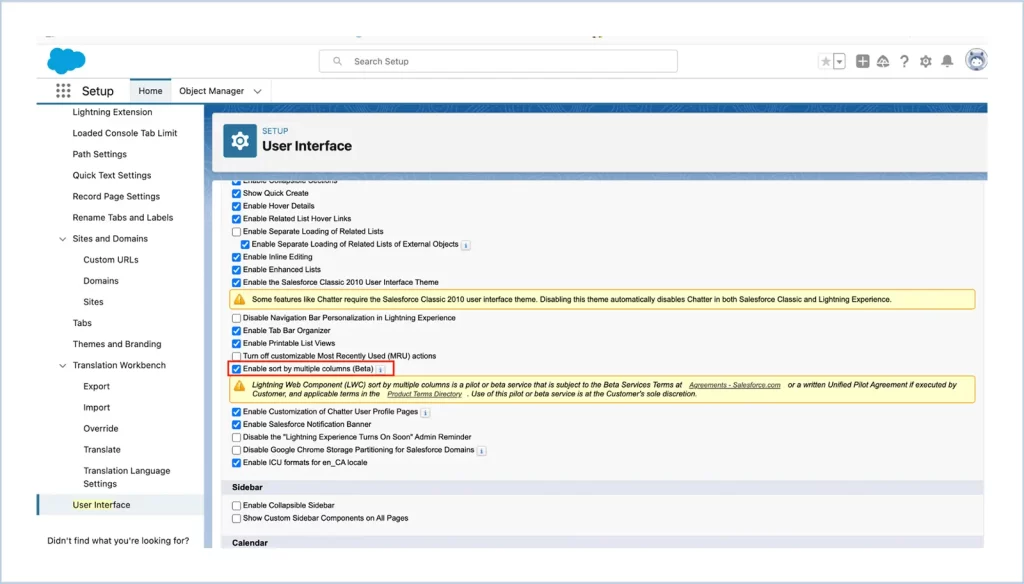
2. Sort by Multiple Columns
The Sort by Multiple Columns feature in Salesforce’s list views allows users to sort records based on more than one column, offering a more detailed and organized view of data. This is especially useful when users need to prioritize data according to multiple criteria simultaneously.
How to Enable Sort by Multiple Columns in Salesforce :
- From Setup, go to Home.
- Access User Interface Settings: Search for User Interface in the Quick Find box.
- Enable Sorting by Multiple Columns: Search for the check the box ‘Enable Sort by Multiple Columns (Beta)’ to activate this feature.

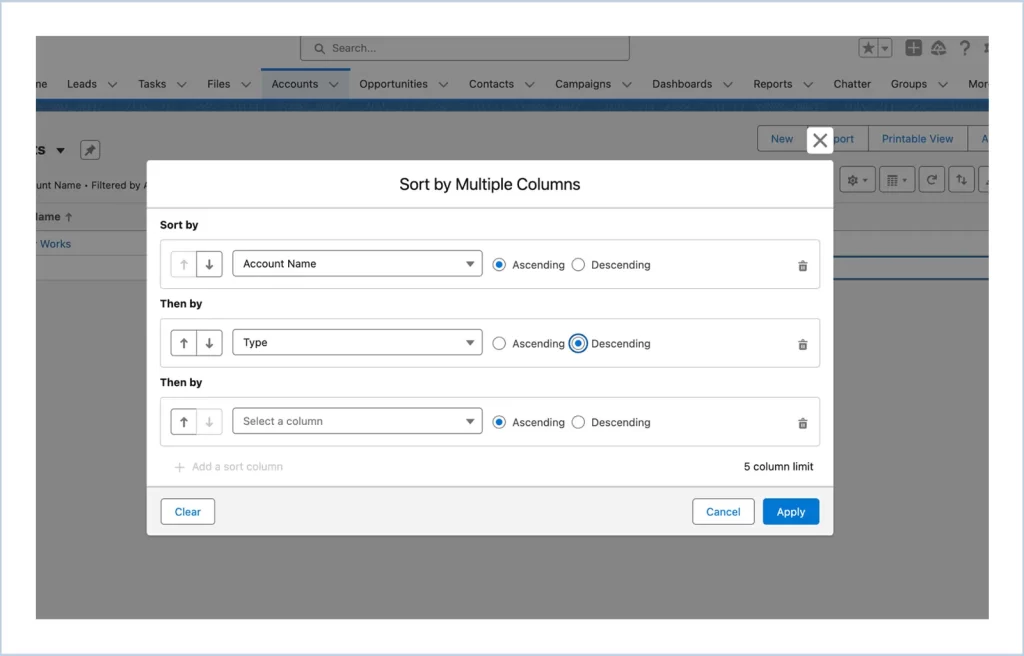
Use Case Example
Imagine a sales manager overseeing a team that handles accounts across multiple regions and industries. The manager wants a list view of accounts where they can quickly see accounts sorted by Industry first, then by Region, and finally by Revenue. By enabling multi-column sorting, the manager can prioritize accounts by these categories simultaneously in one view.
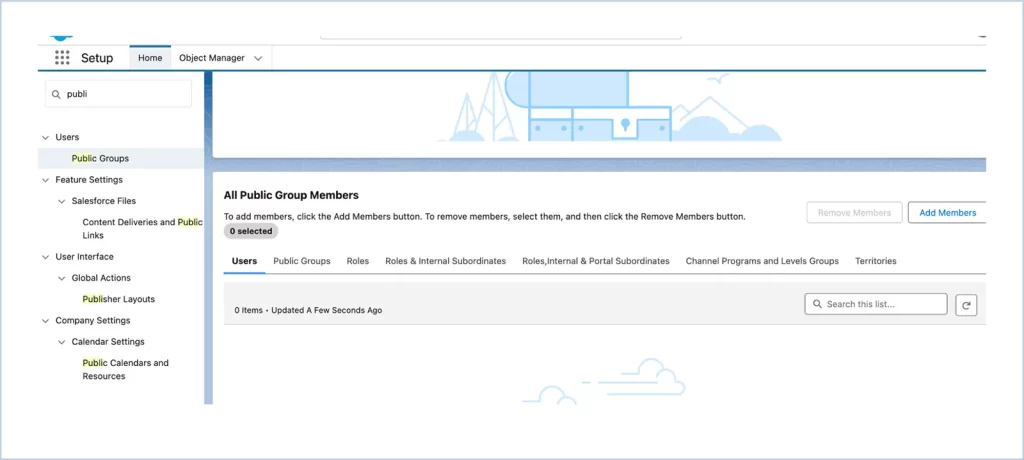
3. Manage Public Group Membership
The Manage Public Group Membership feature in Salesforce allows administrators to add or remove members in public groups, making it easier to control user access and permissions across different parts of the organization.
Public groups are used frequently in sharing rules and other configurations, so efficiently managing their membership can help maintain a secure and organized access structure. It allows quick additions or removals without having to navigate to individual profiles.
How to Manage Public Group Membership in Salesforce :
- Navigate to Setup.
- Access Public Groups: In the Quick Find box, type Public Groups and select it from the search results.
- Select a Public Group: Choose the public group whose members you want to manage.
- View Summary and Manage Members: Click on View Summary for a detailed view of the group. Under All Public Group Members, you can add or remove members as needed.

Use Case Example
Consider an organization where a sales director needs to provide temporary access to a new product launch group for certain sales reps across different teams. By managing public group memberships, the director can add these reps to the group without modifying individual permissions.
4. BCC & CC List in Send Email Action
In Salesforce Flow’s Send Email action, now you can add CC and BCC lists :
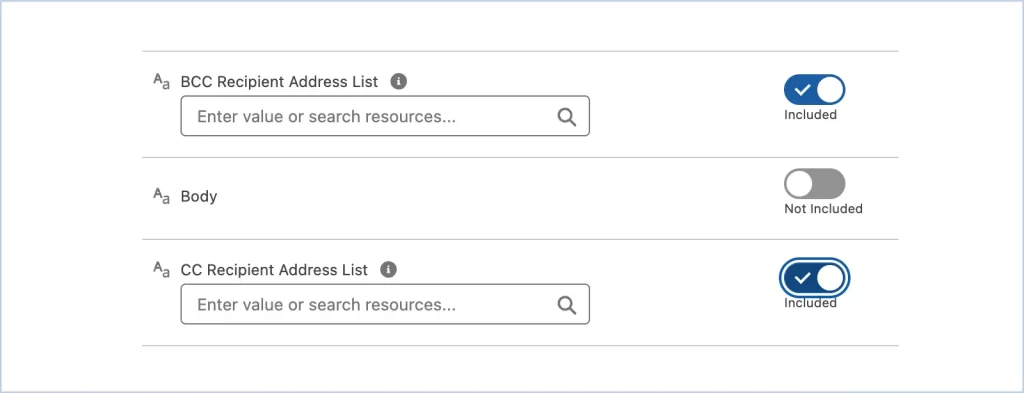
BCC Recipient Address List : Allows you to enter one or more email addresses (separated by commas) to receive a blind carbon copy of the email without revealing recipients’ information to others.
CC Recipient Address List : Lets you add additional recipients in the CC field who should receive a copy of the email visibly, ideal for keeping stakeholders informed.
Use Case Example
When a customer service representative (CSR) escalates a case to a manager for review, they might send an email notification to the customer and CC the manager. This ensures the manager is aware of the escalation, and both the CSR and manager can monitor the case.
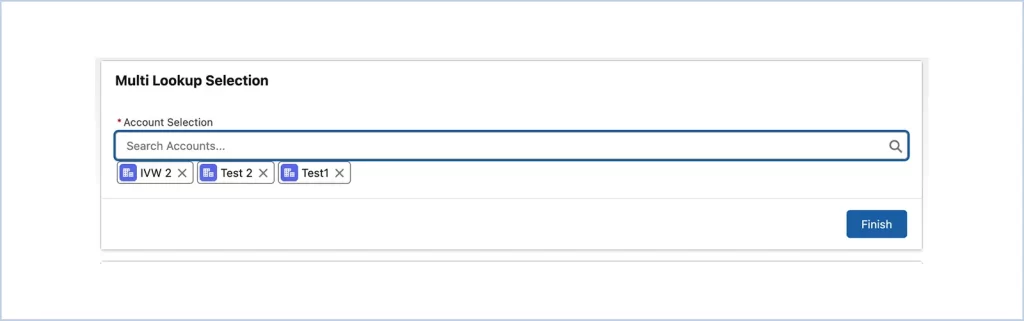
5. Multi Select Lookup in flow screen
The Multi-Select Lookup is a powerful feature in Salesforce Flow that allows users to select multiple records from a list within a flow screen. This feature enhances the standard lookup functionality by enabling users to choose multiple records at once, making it efficient for scenarios where selecting multiple related records is necessary. The selected records are stored in a collection variable, which can then be used in subsequent actions within the flow.
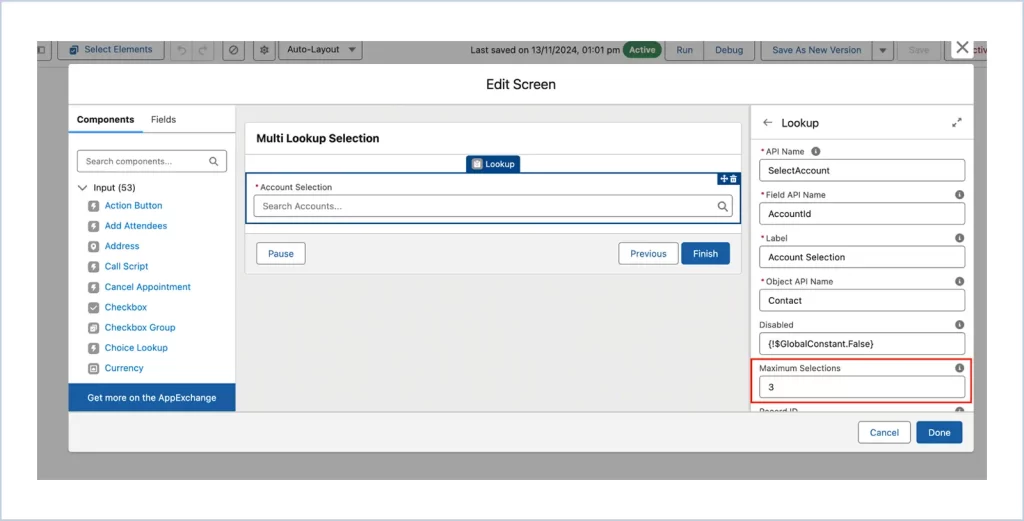
The maximum selection can be defined, in default it takes 1 as maximum selection.
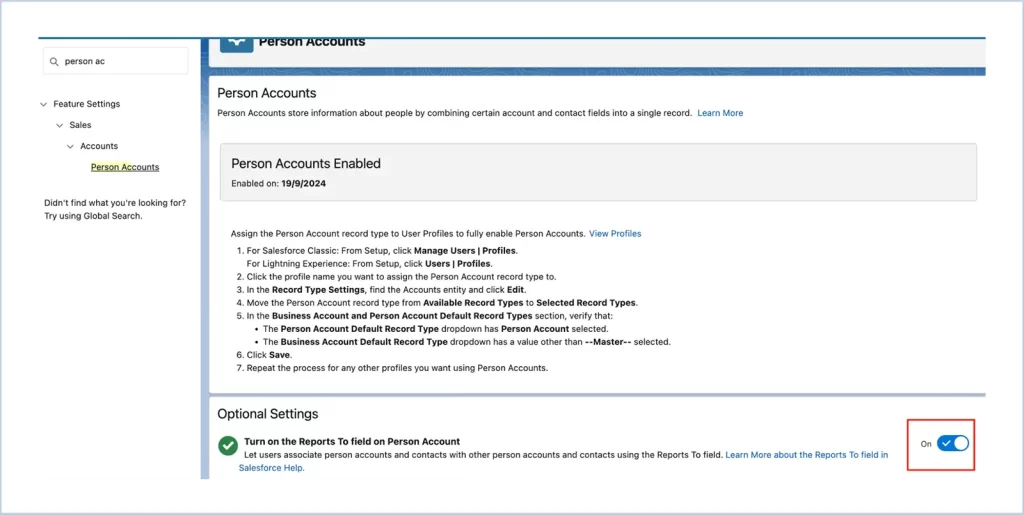
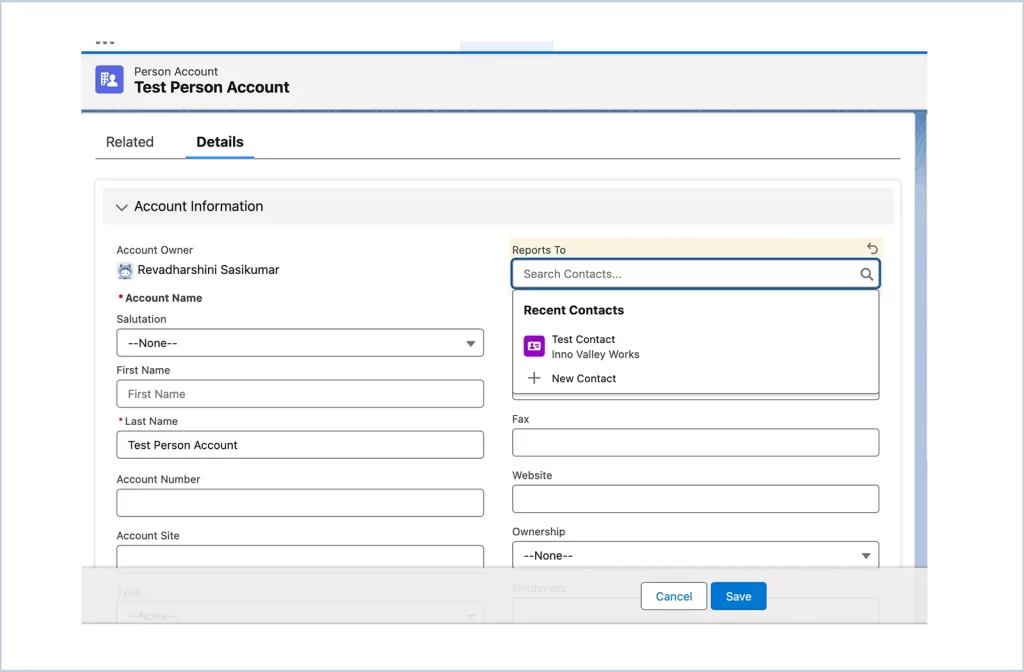
6. Associate Person Accounts and Contacts With Each Other
Person Accounts in Salesforce is to streamline the management of individual records, particularly when dealing with businesses or clients that do not have separate company accounts. Person Accounts are designed for businesses or organizations that deal with individuals, enabling Salesforce users to track both the account and contact information in a single record.
Contacts cannot be created for Person account but the new feature makes it possible to enable person account & contact associate together.
Enable Turn on the Reports To field on Person Account in person Accounts.
In person account page layout, add Reports To field
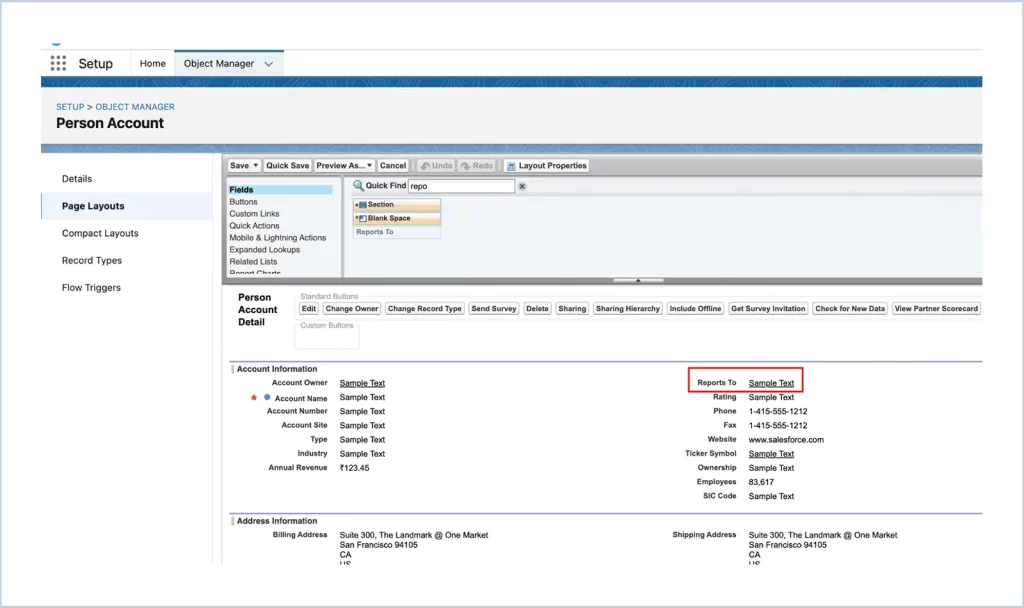
Now, you can select contact for particular person account.
7. View object access from the object manager
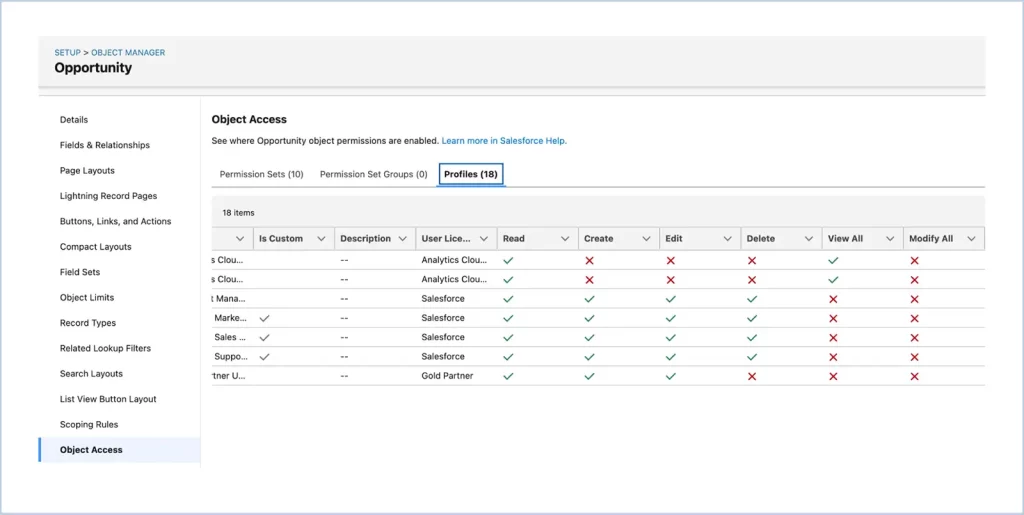
Use Case Example
Consider managing access to the a custom object which contains sensitive information. The organization team needs varying levels of access based on their roles.
Sales Reps should have “Read” and “Create” to create opportunity.
Sales Managers need full “Edit” permissions to review and modify created opportunities.
The access for the object can be controlled in object access itself without moving back to various profiles.